
How to Marble with Nail Polish – Upcycled Mug Craft
Do you have lots of old nail polish cluttering up your bathroom?
Maybe its a bold color you decided didn’t suit you or just the end of a bottle that isn’t quite enough to do a full manicure with?
This post will teach you how to use your nail polish to create a beautiful marble effect on almost anything.
We are going to use a ceramic mug as an example project and then give you other suggestions for cool nail polish marbling projects.

Materials Needed: Marbled Nail Polish Mug

This post contains affiliate links – please see my disclosure policy for more details.
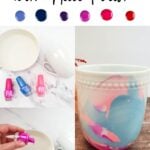
- White coffee mug or tumbler
- 3 colors of nail polish – we used bright pink, light pink, and blue for this project
- 1 cup warm water
- Bowl or plastic tub
- Dishwasher Safe Mod Podge (optional)
Time needed: 5 minutes
This is a simple project that will get you started with marbalizing with nail polish.
- Warm Water
Add 1 cup of warm water to a plastic bowl or other disposable plastic container. Warm tap water is fine – it doesn’t need to be super hot.
Your bowl is going to get nail polish on it so don’t use something that you would cook with. Use a container that is destined for the bin anyway or that you can reuse for future messy craft projects!
1 cup of water should be enough water to add a marble effect to either the bottom or top of your mug. If you want to cover more surface area add a bit more water. - Add Nail Polish
Add a few drops of each color nail polish to your bowl – you don’t need loads so don’t overdo it!
3 colors were used for the marbled colors on this mug – a bright pink, a light pink and a blue. All from the brand Color Mania.
It doesn’t matter what brand of nail polish you use and you don’t have to use exactly 3 colors – experiment and figure out what you like!
- Dip the Mug in the Bowl
You don’t need to stir the water that you’ve just put the nail polish drops in.
Simply dip the mug into the bowl or tub briefly and lift it back out again.
You can achieve different effects by angling the mug either sideways, top first or bottom first.
You can also get an all-over look if your tub is deep enough for you to dip the whole mug in at once (maybe use some disposable gloves or a craft stick if you are going to dip the whole thing!).
See video below to see how simple the dipping actually is!
You can achieve different looks by giving the water a little swirl with a toothpick and changing up the order you put the colors in the bowl too! - Leave to Dry
Set your mug out to dry on a paper towel and do your clean up while you wait!
- Seal with Dishwasher Safe Mod Podge (Optional)
If you want to be able to wash your mug in the dishwasher after this project you will need to seal it.
Mod Podge is great for sealing lots of craft projects but for something like this you’ll want the dishwasher safe version.
Follow the directions on the container to seal your masterpiece.
Finished Marbled Mug using Nail Polish
Here is the finished mug. It looks really pretty compared to how it started – a plain white mug – and nail polish mugs are great for gifts!


Can I put a Nail Polish Mug in the Dishwasher?
No. Not unless you seal it first – see Step 5 above!
Mod Podge is the go-to sealant for most craft projects and they do a dishwasher-safe version that you could use to seal your marble creations.
Other Marble Nail Polish Projects to try!
You can use nail polish to marble anything with a smooth surface that can be dipped into water in a similar way to this mug. Here are some other ideas:
- a ceramic vase
- easter eggs
- a trinket bowl
- a small plastic photo frame
- ceramic ornaments
- plant pot
- use white nail polish on a dark background object
- get the kids involved – set up different bowls with various colors and objects and see what they create!
More posts you might enjoy:
- Paint New Life Into Your Old Coffee Mugs
- How to Upcycle Takeaway Containers into Decorative Trinket Bowls
- 16 Upcycled Jewellery Ideas to Make as Gifts or Keep for Yourself!
- 25 Last Minute Father’s Day Gift Upcycle Ideas
- Junk Journals: What are they and how to make them!
- What is Upcycling & What can you Upcycle?


