
Easy No Sew Rag Bunting


This video tutorial is all about how to make super easy no sew rag bunting from torn up strips of any kind of fabric you have around the house.
You can use scraps from your sewing projects, old t-shirts, old shirts or anything else that can be torn or cut into strips.
This is a tassel style bunting project. We previously featured another version of this by Amanda from Bewley’s Bunting Emporium: No Sew Festival Bunting
I went with a green and white colour theme for my bunting but you can use any combination of colours you like!
Materials Needed – No Sew Rag Bunting
This post contains affiliate links – please see my disclosure policy for more details.
- Length of twine slightly longer than the area where you want to hang your bunting. (mine was 1.8 metres long and was slightly longer than I needed to hang across my fireplace mantel).
- Approx. 80 strips of 18-20″ long fabric (between 1″ & 1.5″ wide). You can include some strips that are half this length but you will not loop them (see the video).
- Some tape or heavy books to secure the ends of your twine while you work.
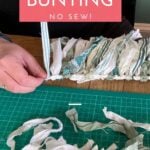
Step 1: Cut your fabric scraps to size
You do not need to be precise with this as you can always trim it at the end. You can also choose to make your strips longer or shorter than mine depending on where you plan to hang it and the look you like.
Step 2: Secure your twine
Secure your twine to your table or the floor using tape or really heavy books. Alternatively you could tie it in between two chairs.
Step 3: Loop your fabric
If you are using longer pieces of fabric scrap you simply fold it in half make a loop, slide the loop under the twine and feed the ends through it. Then pull tight to secure.


If you are using half lengths tie a regular knot onto the twine at one end of the fabric. Try to tuck the short end underneath and out of sight or go back and trim it off when you are finished.
Video Tutorial – Rag Bunting
Finished No Sew Rag Bunting

I gave my bunting a bit of a trim when I was finished. as I was using a mixture of longer and shorter length strips. You can decide how precise you want to be about that!

I’m pretty happy with how mine turned out!


This sort of bunting would be great for a wedding, kid’s room or just as party decor. You can go totally scrappy or go with a colour theme like I did.
If you like this project and you want to return to it later don’t forget to pin it!

Printable Instructions

Easy No Sew Rag Bunting
Easy no sew bunting garland using old sheets, clothing, scrap fabric, ribbon or lace.
Materials
- Length of twine to fit where you want to hang your bunting - mine was 1.8m
- Approx 80 18-20" fabric strips - use any old fabric you have in the colours you like
Tools
- Tape or Heavy books to secure twine while working
- Rotary cutter or fabric scissors to cut and trim fabric strips
Instructions
- Cut your fabric strips
- Secure your twine onto a table or floor with tape
- Fold fabric strips in half.
- Form a loop and place it under the twine.
- Feed the ends of your fabric through the loop and pull tight.
- Repeat for all strips, alternating colours as desired.
- For shorter strips, don't loop just tie one end to the twine and tuck under the short end or trim it off at the end.
- Trim the ends to make them more even if desired.
- Hang with hooks, nails or strong tape.
If you liked this post you might like these ones too:


I love this cute fabric bunting. This would be cute to make for a birthday or as decoration for a party. Thanks for sharing!
So glad you liked it! Definitely great for a Birthday!