
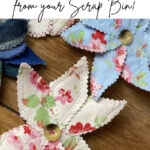
Easy Scrap Fabric Flowers


One really cute way to make something lovely out of scrap fabric (that you might otherwise bin) is to make scrap fabric flowers.
You can add a pin to the back and turn them into brooches, or you can sew them directly onto a hat, bag or lapel as a permanent accessory.
There are lots of ways to make these. Many of the methods I’ve seen before though involve layers of larger pieces of fabric cut out in a flower shape.
But what if your scraps are too small for that?
I have two different methods for you to try below. There is a video below for Method 2 and printable instructions for both at the end of the post.
This post was originally published on our sister blog Scrap Fabric Love.

Jump to Method 1: Easy Scrap Fabric Flowers

Jump to Method 2: Cushy ‘Quilted’ Fabric Flowers

Materials Needed: Scrap Fabric Flowers
This post contains affiliate links – please see my disclosure policy for more details.
For both methods you will need:
- Scraps of fabric
(Method 1: 1-3″ long by 1″ wide; Method 2: 3-4″ long by 1-2″ wide (at the widest point)
- Pinking Shears and/or Fabric Scissors
- Buttons
- Scraps of Quilt Batting (optional – it is used in Method 2)
- Sewing Machine/Needle & Thread
- Sticky Back Felt & Brooch Pins (optional)
Method 1: Easy Scrap Fabric Flowers
The easy method is ‘easy’ because it involves one less step than method 2.
I made two versions using this method – one with a mix of scrap fabrics in blues and greens; and one all in the same fabric.
I used fairly small scraps of fabric for both, they were all no more than 1-3 inches at their longest.

The flower above was made out of scraps of tweed; two fabric sample swatches (the grey and royal blue thicker material); and some scraps of a man’s dress shirt (the medium blue colour).

This second one was made with all one fabric, but some of it was a trimming that I had just cut off and saved and the rest was the corners that I cut off to make the gusset of a quilted bag. So although some of the petals are ‘quilted’, like in method 2, it didn’t use an extra step as it was just an off-cut of another project..
STEP 1: MAKE YOUR SCRAP FABRIC “PETALS”
I started off with making the petals of the flowers.
For the tweed/blue one I decided to make them a bit more pointy and for the red and cream one a bit more rounded.
What shape you choose will most likely be determined by the shape of your scraps to be honest but either way just use your rotary cutter, fabric scissors or pinking shears to get them the shape you want.

For the blue one the longest petal was 2.5″ long and the shortest was 1.5″.
For the red and cream one the shortest was 1.5″ and the longest was 2″.
For the cream and red one I literally stopped making petals when I ran out of that particular type of fabric scrap, so I had 6 in total.
For the other one I was doing more of a colour family thing so I just layered them up until I felt like I liked how big it was.
STEP 2: SEW THE EDGES OF YOUR PETALS

Next I used a zigzag stitch around the edge of each of my petals. I used a shorter stitch for the thin men’s shirt cotton and a longer one for the tweed and quilted fabrics.
These scrap fabric flowers are actually a great project for beginner sewers as you can practice different stitches and turning the fabric in your machine etc.
STEP 3: HAND SEW YOUR FLOWER TOGETHER

To assemble your scrap fabric flower, all you have to do is lay out your petals in the design you like and pick out a pretty button (or several) to finish it off.
For the cream and red one I hand stitched them all into place at once as there weren’t many petals.
For the tweed & blue one I stitched the layers of petals together in the centre first before adding the button in the middle.
STEP 5: ADD A BACKING (OPTIONAL)
Depending what you plan to do with your scrap fabric flowers you can choose to add a backing to finish it off.
I am partial to a bit of sticky back felt myself for this kind of thing.
You can also sew on a brooch pin to make this a removable brooch.
If however you are planning to stitch these scrap fabric flowers straight onto another project like a bag or a hat or something you may not need any backing at all.


Method 2: Cushy Quilted Fabric Flowers

I made a video of this method that you can watch below.
Step 1: Cut Fabric Petals

Cut fabric scraps into ‘petal’ shapes using Pinking Shears. This doesn’t have to be super precise, think of a soft diamond shape if that helps.
My finished petals were roughly 4” long x 2” wide at the centre point.
Step 2: Cut Batting Scraps
Cut batting scraps into slightly smaller petal shapes (this will be the inner padding so it needs to be just a touch smaller than the fabric petals.
Step 3: Petal Sandwich
Sandwich batting in between two fabric scrap petals with right sides out on both sides.
Step 4: Sew

Using a zig zag stitch or a decorative stitch sew all the way around your petal (roughly ¼” seam).
Trim off any raggedy edges with your pinking shears to make the edges look even.
Repeat for each petal.
Use between 5 – 8 petals for each flower.

I did one version with zig zag stitches and another one where I used a different decorative stitch for each petal. It’s actually a great way to test those stitches out on a small scale to see if you want to use them in other projects.
Step 5: Decide on your layout
Lay your petals out in a flower shape.
Pin in place and hand sew a button in the centre making sure to pass the needle through each petal to secure it.
Step 6: Add a backing (optional)
As in Method 1, you can now choose to add a backing to turn your flower into a brooch or simply attach it to as an embellishment to a bag, headband, or hat.
See here for links to backing materials to create a brooch.


Method 2: Video Demonstration
Subscribe to Upcycle My Stuff for more fun ideas like this one.
I’m pretty happy with how these turned out but I’m not sure where I’ll use them yet.
I’ll definitely be making more though!

I would love to see your scrap fabric flowers too! Feel free to drop me a comment or find me on instagram or pinterest to share your photos!
If you liked this post and you want to come back to it later, don’t forget to Pin it!

Printable Instructions

Easy Scrap Fabric Flowers
Easy method of using your scrap fabric to make pretty fabric flowers that you can turn into broochs or use as embellishments on hats, bags and headbands.
Materials
- Scrap Fabric
- Batting Scraps (optional)
- Buttons
- Brooch Backing (optional)
Tools
- Pinking Shears
- Sewing Machine
- Needle & Thread
Instructions
- Cut your fabric scraps into a rough petal shape. Between 1"-4" long and up to 2" wide at the widest point.
- If you are using method 2, sandwich your batting between two petals.
- For both methods sew around the edge of each petal with a zig zag or decorative stitch.
- Lay petals out to your desired flower shape.
- Secure petals together using one or more coordinating buttons.
- Add sticky back felt and a brooch pin to make a brooch or sew directly on to your bag, lapel or headband.
Here are some other posts you might enjoy:
- 17 Brilliant Ideas for Upcycling your Scrap Fabric
- 14 Ways to Upcycle Fabric Scraps as Gifts for Kids
- DIY Fabric Wrapped Hangers: The Scrappy Way!
- Moda Scrap Bag Review
- How to Upcycle Scrap Fabric into Wrapped Bangles
- DIY Necklace Pendant made from Upcycled Fabric Samples
- 13 Scrap Fabric Friendly Sewing Patterns on Etsy


I LOVE this idea! These would be perfect for Zero Waste gift wrap adornments. They could be used to embellish a fabric-wrapped gift or just placed on the item by itself with a pin or clip. Thank you so much!!
Oh thanks so much! So glad you like them! And I love the idea of putting them on gifts too! x Kristen
Loving the look of method 2!!
Thank you so much for this neat opportunity to bust through some scraps!
Ah brilliant! Glad you liked it! Always satisfying when you can use up a pile of scraps isn’t it? x Kristen
Thank you so much for sharing your project. These would look adorable as hair ornaments added to clips or bobby pins or combs or to headbands or decorations on clothes as pins.
So glad you liked them!
Wonderful site! I’m a junk journalist along with other interests. These would look great on a junk journal cover or inside. I’m sure you could adapt to any size and thickness to accommodate your purpose. Thanks
Yes of course they could be made lots of different sizes! Love the idea of adding them to junk journals!