
How to Upcycle Foam Packaging – DIY Pine Cone Wreath
Tutorial by Charlie Miller for Upcycle My Stuff
Holiday season is here and now that it is December most of us have started decorating.
Why go out and buy a wreath when you can make one at home with items you might already have?
In this tutorial, you will learn how to make a DIY Christmas Pine Cone Wreath from found objects and foam packaging that you would otherwise discard.
Materials Needed – DIY Pine Cone Wreath
This post contains affiliate links – please see my disclosure policy for more details.
- Foam packaging (mine was from a faucet I purchased)
- Large bowls for tracing
- Ribbon (my ribbon was saved from flower arrangements at my wedding several years ago)
- Craft knife and/or scissors and/or garden snips
- Pine cones and acorns (found)
- Glue gun or strong adhesive glue
I started preparing for my wreath in the summer and fall by picking up pine cones and acorns while on walks with my family, but it doesn’t have to take to you for a long time.
You can head to the park (or your yard) and collect lots of items for a homemade wreath in one go. Look for things like pine cones, acorns, leaves, twigs, or berries.

For the base of the wreath I used some foam packaging that came with a faucet I ordered months ago, my partner asked why I was storing foam packaging in our closet, but I knew I would find a use for it one day!
Step 1: Cut out your wreath base


Use some kitchen bowls to trace circles in your foam packaging to cut out the circular base shape for your DIY Pine Cone Wreath.
You can of course make it as large or small as your materials allow but remember to leave enough room between your inner and outer circles to stick on all the decorations you’ve collected. Mine was roughly 10cm across.
I used a larger mixing bowl for the outside of the wreath circle and a bowl with a smaller base for the inside of the circle.
I used an Exacto knife (craft knife) to cut the foam, but scissors would work fine as well.
Step 2: Prepare the wreath base

My foam piece seemed a bit thin when I cut it out initially and I was concerned it wouldn’t hold the weight of my pine cones.
So I cut out two rounds and glued them together to make it thicker and stronger. Depending on the type of foam packaging you are upcycling you may not need to do this.
I played around with adding this gold wrapping paper to the base before adding my decorations, but in the end, I decided against using it as it seemed too flimsy.
You could paint your foam or add a Christmassy fabric as a background if you are concerned about seeing the foam packaging through your decorations and embellishments.
You should be able to fully cover your foam though if you have enough smaller bits and pieces collected.
Step 3: Prepare your decorations

Next step is to prep your decorations, brush off any dirt and if necessary trim some of your pinecones.
I liked the ‘swirl’ at the top of some of the pinecones so I cut off the pointed end so it could be affixed with the swirl face up.
You will need some sharp scissors or garden snips to cut the spine of the pinecones.
Step 4: Start decorating!
Now you can start decorating! I added ribbon to the edges, but you can be creative and weave it around.
Start by organizing where you want to place most of your pinecones, and where you will fill in gaps with acorns.
Here is mine in the planning stages.


Now start glueing! I recommend using a glue gun but a strong adhesive glue will work fine as well.
Step 5: Find somewhere to hang your wreath!

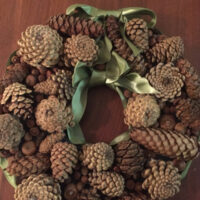
Here is the finished wreath.
There are so many variations you can create from this simple concept using items you have in your home or that you find in nature, so put on some holiday tunes and get creative!
Tutorial was written by Charlie Miller for Upcycle My Stuff
If you liked it, Pin it!

How to Upcycle Foam Packaging - DIY Pine Cone Wreath
Upcycle Foam Packaging into a stylish DIY Pine Cone Wreath - perfect as a Christmas Door Wreath or as seasonal fall decor.
Materials
- Foam packaging
- Ribbon
- Pine cones and acorns
Tools
- Large bowls for tracing
- Craft knife and/or scissors and/or garden snips
- Glue gun or strong adhesive glue
Instructions
- Cut out your wreath base from the foam packaging
- Add a base fabric if you want to see it in between your pine cones
- Brush off any dirt on the pine cones and snip off scraggly bits with garden snips if desired
- Roughly lay out your pine cones on your base and when you are happy start gluing them down with your glue gun.
- Add Ribbon with glue gun if desired.
- Find somewhere to hang your wreath!
You Might like these Christmas Projects as well:


One Comment