
6 Ways to Reuse Packaging as Upcycled Gift Wrap
You can use a variety of items you already have in your home to create beautifully unique and one of a kind wrapping for your gifts. Obviously what you can create will depend on the bits and pieces you have lying around your own home.
To inspire you I’ve document 6 different ways that I reused packaging and other items around my home like scrap fabric, torn tissue paper and old Christmas cards.
It would be interesting to see what you come up with from the items in your own home!

This post contains affiliate links – please see my disclosure policy for more details.
Below are the basic materials for each of the 6 ideas.
Read through the whole post to generally get your creativity going or click on a link to go to a specific project based on the materials you have to hand.
- Cardboard Box & Old Clothes
- Cardboard Box & Torn Tissue Paper
- Takeaway Box & Craft Paper
- Plastic Berry Tray & Upholstery Fabric
- Thin Cardboard Box & Scrap Fabric
- Shoe Box & Scrap Fabric
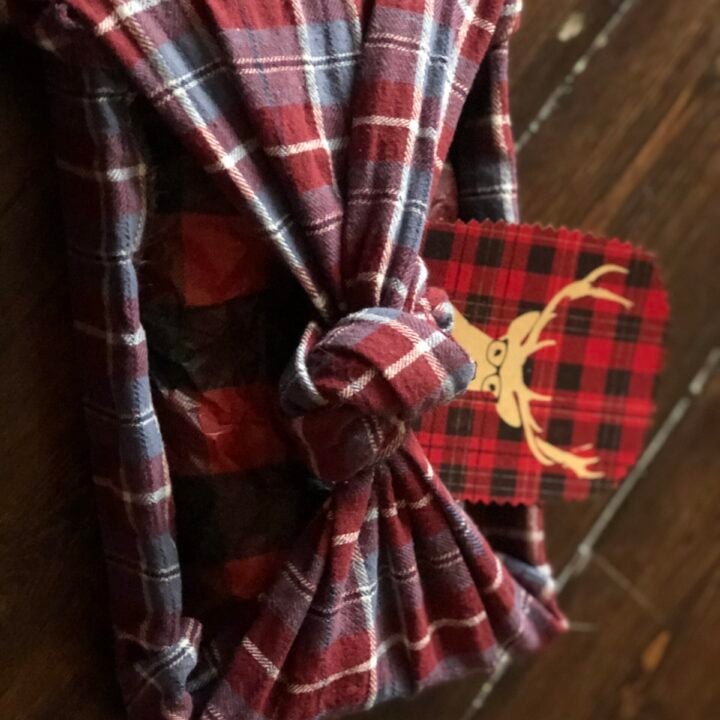
1. Cardboard Box & Old Clothes


For this method, I had this half cardboard box – a sort of a bottom. I think it may have been the box for a toy my son was gifted on his birthday.
I raided the cupboard to see what else I could reuse or upcycle to use it as a gift box.
I found some lumberjack print tissue paper I had saved from a gift I received last year and an old pair of my husband’s torn pyjama bottoms.


I started by putting a small loop of sellotape in the centre of my box to secure the tissue in place.
I folded my tissue in half so that one half was the size of the bottom of the box and the other half could be folded on top of my gift (see photos above).
P.S. the gift inside is a Personalised Name Crayon gift made out of upcycled broken crayons.


Next, I cut up my husband’s already torn pyjama bottoms, removing the waistband and cuffs for other projects and tore them open at the seams to create long pieces of plaid fabric.


I then laid one half of one leg of the pyjama trouser out and placed my box on top in the middle. The length was about 3-4 times the size of the bottom of my box which is what gave me enough fabric to tie the knot at the end.
Before tying the knot, I folded the edges into the side of the box so the seams weren’t visible and folded in the edges of the bits of fabric that were left on either end as well.


I then gathered the fabric from either end of the box and tied one big tight knot in the centre of my parcel. I then tucked under the ragged ends so they weren’t visible.
As you can see the tissue is still visible in the gaps under the fabric so this method is best when you have two colours or patterns that go together naturally.
Finally, I added a gift tag that I made from old Christmas cards. I use pinking shears each year to cut out images and words from the Christmas cards I receive and save them to use as gift tags the following year.
I just tucked the tag in, I didn’t use anything to attach it. I thought this particular tag fit the slight hipster vibe of the plaid and lumberjack patterns of the fabric and tissue paper!

Upcycled Gift Wrap - Old Clothes
Reuse packaging and old clothes to wrap a Christmas present.
Materials
- Small cardboard packaging box bottom
- Torn Pyjama Bottoms
- Tissue Paper
- Cut out from a Christmas Card
- Sellotape (optional)
Tools
- Fabric Scissors
- Pinking Shears
Instructions
- Put a small loop of sellotape in the middle inner of your cardboard box bottom.
- Fold over tissue paper and secure it the bottom of the box with the tissue paper.
- Insert your gift and cover with the remaining tissue paper, tucking it into the sides.
- Cut the pyjama bottoms (or other old clothes) into one long strip about 3-4 times the length of the bottom of your box.
- Fold in the edges of the clothing int the sides of the box and also fold in the dangling edges to hide any ragged seams.
- Tie the loose ends together in a knot.
- Tuck the loose edges under the knot to hide.
- Use Pinking Shears to cut out an image from last year's Christmas Cards to use as a gift tag, then tuck it in to your gift!
Recommended Products
As an Amazon Associate and member of other affiliate programs, earnings are made from qualifying purchases.


2. Cardboard Box & Torn Tissue Paper
I had a lovely cardboard box top and bottom from a gift of perfume I was given several years ago. The bottom was plain pink and fine to use on its own, but the top obviously had the name of the perfume and pictures of perfume bottles on it.
I decided to use some tissue paper I received from another gift to decoupage over the top.
The tissue paper I used is the kind of tissue paper that gets scrunched up into a ball or torn when opening a gift making it difficult to reuse for other people’s presents. I still save it and this is the sort of thing it can be used for.


The gift box top already had some pink colour detail so I used some different coloured pink tissue so that it didn’t matter if that printed pink showed through.
I then added some more opaque gold tissue paper and strategically placed it to hide the brand name and perfume bottle illustrations.


First I applied Mod Podge to the whole of the box top and then I layered on strips of torn tissue, brushing on mod podge as I went.
Once I had the whole box top covered in tissue paper I applied a thin layer of Mod Podge over the whole of the box top.

After letting it dry and putting my present inside I closed it with some twine and added another gift tag made from offcuts of last year’s Christmas cards.

Reused Cardboard Box and Old Tissue Paper as a Gift Box
Reuse cardboard box packaging and old torn tissue paper as a gift box using decoupage.
Materials
- Small cardboard box packaging
- Old crumpled or torn tissue paper
- Mod Podge
- Twine
- Old Christmas Cards (optional)
Tools
- Small paint or craft brush
Instructions
- Apply Mod Podge to the box top.
- Tear small strips off of your tissue paper and decoupage them onto the box top. Brush Mod Podge over each piece as you place it on the box.
- Continue layering using different sizes, shapes and colours of tissue paper until the box top is covered.
- Apply a final thin coat of Mod Podge over the whole box top.
- Leave to dry for a minimum of 1 hour.
- Finish off your box with twine or a reused ribbon and an upcycled gift tag.
Recommended Products
As an Amazon Associate and member of other affiliate programs, earnings are made from qualifying purchases.

3. Takeaway Box & Craft Paper

For this gift wrap idea, I used a child’s takeaway pizza box from Pizza Express. The pizza had been on some napkins inside so the box was grease-free.
The bottom of the box was plain black with white stripes and it was only really the Pizza Express logo on the top that I wanted to cover.

I looked in my craft cupboard and found a pad of geometric craft paper someone had given me a while back. I found a piece inside that I thought would continue on the black and white theme.
I cut it so that it was exactly the size of the top flap of the box – just the top not the side closure tab as that was all black with no print on it.

Next, I used Mod Podge to glue the paper down and also for a sealing coat on top. If you don’t have Mod Podge you could use another type of white glue or in a pinch sellotape.
I decided to make a little decoration to use up the rest of the piece of paper I had cut for the top.
I started by cutting the extra strip of paper into four – not much measuring went on it was just so I had four pieces of slightly different sizes to work with.


I then rolled each piece up starting from the corner with the pattern on the outside.
I then gathered the four pieces together in a fan type arrangement and used a small piece of sellotape to tape the ends together.

Finally, I found another cut out from last year’s Christmas cards in a contrasting red and used it as my gift tag.
I used a small piece of tape to attach the decoration to the underside of the tag, and another piece to attach the tag to the box.
I only taped the tag at the top so that it could still be flapped up to see the note to the recipient.

Takeaway Box and Craft Paper turned Gift Box
Turn a Pizza Express Takeaway Box into a monochrome geometric gift box using craft paper.
Materials
- Small Takeaway box with tab closure
- Geometric print craft paper
- Sellotape
- Mod Podge
- Old Christmas Cards - optional
Tools
- Scissors
- Small paint brush or craft brush
Instructions
- Cut craft paper to fit the top flap of the box to cover the branding.
- Use Mod Podge to glue and seal the paper to the top of the box.
- Cut the leftover paper into 3-5 pieces. Roll them and tape them together at one end to create a fan style embellishment.
- Use a cut out from an old Christmas card as a gift tag and attach both the tag and embellishment to the front of the box.
Recommended Products
As an Amazon Associate and member of other affiliate programs, earnings are made from qualifying purchases.

4. Plastic Berry Tray & Upholstery Fabric

For this gift wrap idea, I reused the packaging from a punnet of blueberries. It came in this plastic tray covered in cellophane.
I also reused an offcut of upholstery fabric.

I started by taking another piece of secondhand tissue paper and placing it in the container, leaving enough tissue paper to fold over the top of my gift.
Next, I found an offcut of upholstery fabric that I liked the pattern of. It was probably a bit big for the gift but that is what gave me the idea for wrapping it this way.


I placed the upholstery fabric pattern down and put my gift in the middle.
I then folded one side of the fabric over the top of my gift and then tucked it in underneath it.
With the other side of the fabric, I folded the selvedge edge under to hide the writing and then folded it over the top of my gift.


For the loose edges on either side, I folded them in twice and put some sellotape down on top to hold them in place. I then used some twine to tie bows on either end to secure the gift closed and create a bon bon type shape for my gift.

Because of the folding over I essentially had a little pocket on the top of my gift and I used that to tuck in my gift tag – again an offcut from an old Christmas card.

I love this one as there is no sellotape required so the upholstery fabric can still be reused again as I haven’t cut or glued it.
There is probably enough of it there for the seat of a dining room chair or maybe a footstool.

Plastic Berry Container and Upholstery Fabric as Gift Wrap
Use a plastic berry punnet and off cut of upholstery fabric to make a bon bon shaped gift parcel.
Materials
- Plastic Berry Punnet
- Reused Tissue Paper - optional
- Off cut of Upholstery Fabric
- Twine
- Upcycled Gift Tag - optional
Tools
- Scissors
Instructions
- Place your tissue and gift inside the berry punnet.
- Place the upholstery fabric pattern down with the gift in the centre.
- Fold one side of the fabric over and under the gift.
- Fold the edge in on the other side of the fabric and fold up over the gift to close.
- Fold in each edge twice and find something heavy to hold the folds in place.
- Use twine or reused ribbon to secure the ends.
- Tuck an upcycled gift tag into the 'pocket' you created on the top.
5. Thin Cardboard Box & Scrap Fabric

This gift wrap project was a super simple one because I was reusing this Roots Canada box that only has one bit of branding on it and no other writing at all. Perfect for upcycling!
If you’ve read this far you’ll know I have a huge stash of cutouts from last year’s Christmas cards.
These can be very different sizes so the first thing I did was look for one big enough to cover the beaver logo on the top of the box.

Once I found one I used Mod Podge to glue it down and seal it on the top.

Next, I found a long piece of scrap fabric in Christmassy sort of colours that were leftover from this Scrap Fabric Bracelet project. It was a bedsheet many moons ago!

Once the top of my box was dry and I’d put my present inside, I tied it shut using the fabric as a bow.
Lastly, I added another Christmas card offcut as a gift tag.
Super easy and I think super cute!

Roots Canada Box Upcycled as a Gift Box
Super simple upcycled gift wrap idea using a Roots Canada box, Christmas Card off cuts and a piece of scrap fabric.
Materials
- Roots Canada Sock Box
- Long piece of scrap fabric
- Old Christmas Card cut outs
- Mod Podge
Tools
- Pinking Shears
- Small paint brush or craft brush
Instructions
- Use the pinking shears to cut out a design from an old Christmas card that is big enough to cover the logo.
- Use Mod Podge to glue and seal the piece of card over the logo.
- Leave to dry for at least 1 hour.
- Tie the gift shut with a long piece of scrap fabric tied into a bow.
- Add an upcycled gift tag!
Recommended Products
As an Amazon Associate and member of other affiliate programs, earnings are made from qualifying purchases.
6. Shoe Box & Scrap Fabric

This gift box started as a child’s shoebox. For this box, most of the writing that needed covering up to use as a gift box was on the bottom of the box. There was just a tiny little slogan on the top of the box.
I decided to wrap the outside of the bottom box in fabric using fabric spray adhesive.
I first picked out a piece of fabric of the right length to wrap all the way around.
When I say all the way around, I mean all the way around the four sides but leaving the bottom uncovered.


Next, I sprayed adhesive all the way around the four sides and pressed my fabric down, stretching it and smoothing it as I wrapped it around each side.
The piece I used was wider than my edges which is the overhang you see in the photo.
When I got to the final edge I sprayed a small bit of fabric glue on top of the beginning of my fabric (as in the first piece I had stuck down) and folded the end of my scrap under and stuck it down on top to seal it. Very similar to what you might do with wrapping paper to hide the edge.


Once the glue had dried I trimmed the excess fabric off at the edges. I used some of this trim to decoupage onto the top of the box in little strips to make a Christmas Tree design.
The little slogan on the top of the box was nice enough but it is still branding so I wanted to cover it.
I used 5 strips of the scrap fabric, cutting each one smaller as I went up the tree.
I started by laying them out to see where they needed to go to cover the slogan and also look relatively natural in terms of placement on the box.
Once I was happy with the placement I used Mod Podge to glue them down and seal them.


Lastly, I used a star cut out from last year’s Christmas cards for the star at the top of the Christmas tree and a small bit of grey and white washi tape for the trunk of the tree.

Upcycled Shoe Box to Gift Box with Scrap Fabric and Washi Tape
Use scrap fabric and washi tape to reuse a shoe box as a Christmas Gift Box
Materials
- Shoe Box
- Scrap Fabric
- Fabric Adhesive
- Mod Podge
- Washi Tape
- Old Christmas Card cut outs - optional
Tools
- Fabric Scissors
- Pinking Shears
Instructions
- Spray fabric adhesive around the outside of the bottom of the shoe box.
- Secure fabric to the outside of the box and fold over the loose end and seal it down over your starting place.
- Leave to dry at least 1 hour.
- Trim off excess fabric.
- Use bits of trimmed fabric to cut 5 strips to form a Christmas Tree design. Each strip should be marginally shorter than the one below. Exact length depends on your box size.
- Finish with a piece of Washi Tape for the trunk and a cut out star for the top.
Recommended Products
As an Amazon Associate and member of other affiliate programs, earnings are made from qualifying purchases.

Hopefully, these examples of how you can reuse packaging and other items from around your home to wrap your presents will have inspired you!
If you would like to share what you came up with please comment below, find us on social media or join our Facebook Group Upcycle My Stuff Share My Stuff where members regularly share their own upcycling projects.
If you are looking for even more upcycled gift wrap ideas check out the Upcycler’s Guide to Gift Wrapping.
If you liked it, Pin it!


6 Comments