
Make a Cushion Cover from an Orphan Block (with Lazy Zipper Hacks)

This tutorial is all about how to easily make a cushion cover from an orphan block. What is an orphan block you might ask? Read on!
If you’ve followed me for any length of time you probably know that I have a thing for buying fabric remnants, scrap fabric bundles and other people’s old jeans on ebay.
This post contains affiliate links – please see my disclosure policy for more details.
Buying Orphan Blocks
Well recently I also started buying other people’s unfinished quilt blocks.
When a quilt block is sewn together (called piecing a block) but it doesn’t make it into an actual quilt it gets called an ‘orphan block’.
Most quilters have at least a few of these lying around. This is often because quilters make test blocks for patterns to see if they like fabric combinations or test a technique. But you can also end up with UFOs (Unfinished Objects) – another bit of quilting slang that just means a project you didn’t finish.
The patchwork blocks I bought recently where from a lady who sadly has alzheimers and can’t continue on with her project. There was a huge stack of blocks all made up of hexagons that she sewed together using english paper piecing.
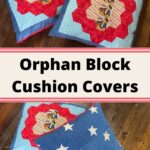
Some of the blocks are similar colours and so I’ve decided to make them into a few charity quilts but there were two blocks – blue and red ones with teddy bears on them – that didn’t quite fit with any of the others.
So I decided to make them into cushions for my sons.

Below is a video tutorial that you can watch and if you scroll further down you will also find the printable instructions.
Video Tutorial: How to Make a Cushion Cover from an Orphan Block
Zipper Hacks

This tutorial also includes my favorite zipper hacks.
As most of you know, I’m a self-taught/YouTube-taught sewer.
I have really tried to follow the instructions I have seen for sewing straight zippers, but they never quite resulted in a straight line for me!
So I came up with two methods for sewing my zippers on that involve lining my foot up against different parts of my project depending on how far or near the zipper teeth I want to stitch.
I used one method each for the two cushions I made to show you the difference. You’ll see all the details in the video above and in the printable instructions at the end of this post.
Denim Remnants for the Cushion Back

I used strips of denim fabric remnants I bought on eBay for the back. The stars were already on the fabric!
I pieced the strips together until they were the size I needed for my cushion back.
Here are some other posts you might enjoy:
- How to Cut Up Old Jeans for Sewing & Upcycling Projects
- 17 Brilliant Ideas for Upcycling Your Scrap Fabric
- Easy Sew DIY Kid’s Wall Hanging from a Fabric Remnant
- Mini Quilt-as-you-go Keychain
- Scrappy Disappearing Nine Patch Quilt
- Sewing for Charity
- Sewing Room Organization Tips – No Cost Before & After Makeover
- Or check out our full Sewing Section for even more great ideas!
If you liked this post and you want to save it for later, don’t forget to Pin it!


Make a Cushion Cover from an Orphan Block (with Lazy Zipper Hacks)
Use Orphan Blocks to Make Easy Cushion Covers with zippers. Includes two easy hacks for sewing your zippers straight.
Materials
- Orphan Quilt Block or Fabric Panel
- Fabric for your cushion back the same size as your block (I used denim remnants pieced together)
- Cushion pad (preferably 2" bigger than your finished cushions size
- Zipper (length depends on the size of your cushion but it's okay if it is a little shorter because you can add zipper tabs)
Tools
- Sewing Machine
- Scissors
- Rotary Cutter
- Iron
Instructions
- Choose your orphan block or fabric panel. Any size you want for your cushion is fine.
- Choose a backing fabric and square up (cut) both the back and the front to the same size. I used denim remnants that I had to piece together to make them big enough for the back of my cushion.
- Pick your zipper and decided if you will add zipper tabs.
- If you are adding zipper tabs: cut a 2" strip of coordinating fabric to the length needed to extend the zipper to the same length as your cushion. Then fold and sew on top of the ends of your zipper with the fold facing in.
- Trim off excess from the zipper tabs if needed.
- PIn the zipper right sides together to the cushion top.
- Use either Zipper Hack Method 1 or 2 to sew your zipper on.
- For method one: line the edge of your zipper foot to the edge of the zipper teeth so that your needle is on the opposite side of the zipper foot to the teeth. Sew all the way down moving the zipper pull out of the way when you reach it.
- For Method two: centre the zipper foot on top of the zipper teeth so you are sewing in a straight line very close to the zipper teeth.
- Flip open and carefully iron along the stitch line.
- Top stitch to help the zipper lay flat - see the video for two different ways of lining up your top stitching depending on which zipper hack method you used. In short for method one you will have a wider gap between your zipper and top stitch line than method two where you will stitch closer in.
- Repeat for the back of the cushion.
- Open your zipper halfway then pin the front and back of your cushion together right sides to right sides.
- Stitch from one end of the zipper to the other using a 1/4" seam allowance.
- Trim away bulky seams and clip the corners.
- Open the zipper all the way and turn your cushion right side out.
- Use a chopstick to push out the corners.
- FIll with a cushion pad that is 2" bigger than your finished cushion.
Subscribe to Upcycle My Stuff on YouTube for more fun ideas like this one.


