
Scrap Fabric Owl Soft Toy – Free Pattern Templates & Tutorial
I made quite a few of these Softie Fabric Owls for the little kids on my Christmas list last year.
They are easy to make and a great sewing project for beginners so I thought I’d do a tutorial and includes the free template for cutting the pieces out (see below to get yours!)
NOTE: Printable instructions and a video tutorial are at the end of the post.
Materials Needed – Fabric Owl
This post contains affiliate links – please see my disclosure policy for more details.
Fabric Cutting Sizes
These are rough guides for the size of scrap fabric you will need in order to cut out the free pattern template pieces at full size. NOTE: You can easily make different size owls by scaling the paper pattern template on your printer. The cutting instructions below are for 100% scale.
You can also make the fabric pieces below out of more than one piece of fabric or use ‘made fabric’ like I did for the Owl in the video tutorial below.
- Two pieces of cotton fabric approx 10″ x 8″ – for the front piece and back piece of the owl
- Two pieces of cotton fabric approx 6.5″ x 2.5″ (for the wings/side body pieces)
- Two pieces of cotton fabric approx 3″ x 3″ (for the eye circles)
- 1 piece of cotton fabric approx 3″ x 2.5″ (for the beak piece)
Other Materials Needed
- Heat n’ Bond Lite or an equivalent fusible product
- Soft Toy Eyes & Nose Kit or Two Black Buttons
- Soft Toy Stuffing
- Awl Tool (optional but very useful if you are using proper soft toy eyes)
- Friction Pen
- Thin Paint Brush or Chopstick (for helping to turn the ears)
- Fabric Scissors
- Sewing Machine
Step 1: Prepare your Templates
Print out the free templates (fill in your email below for an instant download file) at 100% scale. Use the cutting lines (seam allowance included) to cut out the shapes.
If you plan on making more than one fabric owl I would suggest using the paper templates to transfer the shapes to cardboard as it makes it much easier to accurately trace the shapes on your fabric for cutting.

Step 2: Cut Out your Fabric Pieces

Use your paper or cardboard templates to trace the shape on the wrong side of your fabric and then cut out with sharp fabric scissors.
NOTE: Only one wing shape is incuded in the templates so you need to flip it and cut one shape on each size so that the side body pieces look like wings that mirror each other (see photos)!


I have made versions of these owls with both pieces of leftover fabric and pieces of fabric I ‘made’ using much smaller scraps.
You can get creative and piece together your fabric pieces from any number of scraps to get a piece the right size to cut your template from. The scrappier the better!
Step 3: Preparing your Heat n’ Bond

Next you want to place your wings, beak and eye circles on the paper side of your heat n’ bond.
Outline them roughly with a pen or pencil and then cut out your heat n’ bond about a 1/4″ inside your drawn line.
Place the mesh looking side of the heat n’ bond on the wrong side of your fabric pieces and fuse in place with an iron. You only need to iron it for a few seconds for it to adhere.
Step 4: Fusing your Shapes in Place

Choose which of the two fabric pieces you cut out for the owl’s body will be the front and lay it right side up on your ironing surface.
Lay out your wings, beak and eyes and position them how you like them.
Don’t worry if your wings overlap the side of the body a bit. Just look at the centre and make sure it looks vaguely like owl wings! You can trim any excess off after he’s been sewn together.

Once you are happy with your layout peel the paper backing off of your heat n’ bond and place it back down on top of your owl body. Fuse in place with your iron.

I usually do the wings first and then peel the paper off of the eyes and beak and fuse the face down all at once.
Step 5: Raw Edge Applique

Fusibles like Heat n’ Bond are not like fabric glue – they are not something you can rely on to hold your shapes in place indefinitely. So we need to secure the edges of our shapes with some ‘raw edge applique’ – which just means we are stitching over the raw edge rather than turning it under first.
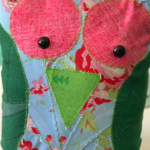
You can use either a blanket stitch or a zig zag stitch for this. I’ve used both with this pattern and the owl’s turn out cute either way. (See image at the end of this blog post – the brown owl has blanket stitch and the pink owl has zig zag stitch)
Blanket stitch is a bit slower to do but tends to look more polished and zig zag is much faster but has a bit more of a homemade patchwork look.
There are a lot of curves in these pieces so whichever stitch you are using just take your time and stop to pivot and raise your presser foot when needed to reposition your owl.
Sew all the way around the edges of your eyes and beak and along the inner edge of your wings. If the outer edge of your wings will be caught up in the seam you don’t need to stitch over them at this stage. If they are further to the middle then go ahead and stitch all the way around.
Step 6: Adding Soft Toy Eyes

I have a kit with different sized soft toy eyes that I use for these owls but if you don’t have any you can use a black button for an eye just as easily.
For both methods, start by marking the position of the eyes with a friction pen. I’ve made these owls both with the eyes dead centre and 3/4 of the way down. Both look cute so pick your favourite!
For soft toy eyes you will now use your awl tool to poke a hole right through the fabric where you made your pen marks. Make the hole just big enough to fit your desired eye base through and then attach the back fastener.
For button eyes just hand sew in place over your pen marks.
Step 7: Sewing the Owl Together
Nearly finished!

Place your two owl body pieces right side together and sew all the way around the edge with a 1/4″ seam allowance leaving a small opening at the bottom of the owl for turning (3″ should be sufficient).
Step 8: Turn your Owl Right Side Out
Before you turn your owl right side out go around and trim any excess fabric from around the edges of your owl.
Then clip the tips of the ears (without cutting through your stitch line!) and make some small notches in the seam allowance where the ears meet the body and along the curved edges. This is so the seams sit nicer when you turn it right side out.
Turn your owl right side out using a chopstick or thin paintbrush handle end to get gently poke the ears until the tips are out properly.
Step 9: Stuffing & Closing
The last steps are to stuff your owl with your soft toy stuffing. I use the paintbrush handle or chopstick again at this stage to push the stuffing into the ears and distribute it evenly.
When he’s good and stuffed turn in the raw edges of your turning gap and hand stitch the gap closed with a coordinating thread.
Finished Scrap Fabric Owl Soft Toy!


These cute owls are a great homemade gift idea for a young child and I think it’s a great project for beginner sewers looking to make something quick and easy. It’s so satisfying to see one of these owl softies come to life so fast!
If you like’d this project don’t forget to Pin it!

Printable Owl Softie Instructions

Scrap Fabric Owl Stuffed Toy Tutorial - Free Templates
Make a Cute Fabric Owl Softie using scrap fabric. An easy beginner sewing project that is quick to make!
Materials
- Different sized scraps of cotton fabric to fit the free templates provided.
- Soft Toy Eyes or Black Buttons
- Heat n Bond Lite
- Soft Toy Stuffing
Tools
- Sewing Machine
- Awl
- Friction Pen
- Fabric Scissors
Instructions
- Print out the free templates at 100% scale and transfer to cardboard if desired.
- Cut out owl shapes from your fabric scraps or 'made fabric'
- Use heat n' bond to fuse the wings, beak and eye circles in place on the front piece of the owl.
- Use a blanket stitch or zig zag stitch to raw edge applique the shapes in place
- Add soft toy eyes or button eyes. Use your awl to make the hole for soft toy eyes if you are using them.
- Sew front and back of the owl body right sides together leaving a small opening at the base for turning.
- Clip excess seams and make notches where needed.
- Turn owl right side out.
- Stuff with stuffing.
- Handstitch the opening closed at the bottom with a coordinating thread.
- Finished!
Subscribe to Upcycle My Stuff on YouTube for more fun ideas like this one.


What an adorable project!! I’m really excited to try it with my recycled wool, and see how it looks. I think it will be so cute!
Thank you for posting clear directions and the pattern too. I love it! I might even try making one from leftover polar fleece for babies too. Thank you so much!!!
Oh fab! So glad you liked it! I’d love to see how it turns out with recycled wool and fleece! x Kristen
I just found your site and so interesting as I love to use old fabrics to make new use with them. I love your ideas, thank you from Florida. Sassy
Aw fab! So glad you are finding some ideas you like! Hi from Scotland! Kristen
I am having trouble downloading the scrappy owl template. I signed up at the bottom of the web page, but don’t see how to download the template. Thanks for your help.
Hi! You should receive it in your email – if you can’t find it just email me at [email protected] and I will send it to you! x Kristen
I love this project my friend and I are going to be grandmothers together I’ve been making burb cloths, and receiving blankets can I make this owl out of flannel scraps? Not sure if the heat n bond will work on flannel! Do you have any advice!!
No reason why it wouldn’t work on flannel! Sounds like it would make a lovely soft owl!
wOULD like owl template please and thank you
You just need to enter your email and you should get the templates to your in-box!
Please send owl pattern. Love this idea
There is an email form on the tutorial page and when you fill it in you will get the owl templates sent directly to you. Enjoy!
Please can I have a copy of the owl template
There is a form on the post to enter your email and you should get the templates sent to you automatically. Have fun with it!