
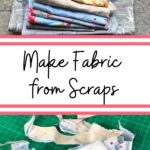
How to Make Fabric from your Scraps – Part 1: Irregular Shaped Scraps

This tutorial is the first in a series all about different ways you can make fabric from you leftover sewing scraps.
This method is all about how to turn the strangely shaped fabric off cuts from a sewing or quilting project into yardage of fabric that is all the same colour or pattern.
So this isn’t crazy crumb quilting where you get a piece of fabric all different colours – this is about how to get more usable fabric from a pile of scraps of the same or similar fabric.
I have plenty of tutorials about how you can use just a few irregular shaped scraps to make sweet little projects like scrap fabric flowers or how you can use teeny tiny trimmings to make bookmarks but this tutorial is about making a new piece of fabric that you can then use for any number of projects.

What projects can you use ‘made fabric’ for?
- Quilt blocks (cut a square or use parts of it to piece a more complicated block)
- Bag Panels
- Applique Shapes
- Zipper Pouches
- Wall hangings
- Soft toys (I used it for this scrap fabric owl softie)
- Cushion Covers
- Panel on a jacket
- Patch for visible mending of clothes
- Doll’s clothes
- Basically any project where you don’t mind seeing the join lines in the fabric!
Materials Needed – How to Make Fabric from your Scraps:
This post contains affiliate links – please see my disclosure policy for more details.
- Collection of scrap fabric that is either all the same or has similar colours and patterns in it.
- Lightweight iron on fusible interfacing. I’ve linked to one that is similar to what I used, but any lightweight single sided fusible interfacing will work.
- Pressing surface – ironing board or a wool pressing mat.
- Sewing Machine Thread that matches the scraps you are working with.
- Teflon sheet (optional)
Step 1: Choose what size of fabric you will make
The maximum size piece of fabric you can make depends on two things: 1) how many scraps you have & 2) how large your ironing surface is.

I use a wool pressing mat for most of my ironing so the size of that mat is the maximum size of fabric I tend to make. My pressing mat is 12″ x 18″.
Once you have choosen the size of fabric you will make cut your lightweight fusible to that exact size.
Your scraps are going to cover the entire surface of the fusible so do try to estimate as best you can how many scraps you have and what surface area they will cover.
You’ll get better at doing this the more pieces of fabric you make.

Step 2: Arrange your scraps
When you have cut your fusible to size, place it fusible side up on your ironing surface.
Next start placing your scraps right side up on top of the fusible.
This is when it becomes a bit of a jigsaw puzzle. You want the scraps to overlap each other a little bit but not too much. We are trying to avoid seeing any gaps between the scraps.
You shouldn’t be able to see any of the fusible product once all your scraps are laid out. However you don’t want to overdo the overlapping either because then you will have too much bulk in your fabric.
I usually start laying my scraps along the edges and then working in to the middle but you can do it however works for you of course!

Step 3: Fuse your scraps into place
If this is your first time doing this I would suggest you wait until you have all your scraps laid out before you use your iron.
However if the scraps are proving hard to keep in place or you have a teflon sheet that you can put in between your iron and the scraps/fusible then you can go ahead and iron them into place piece by piece.
If you don’t have a teflon sheet make absolutely certain that you can’t see any fusible showing in between your scraps before you iron.
When you are ready to iron use the cotton setting and press down over each section of your ‘fabric’ for a second or two (do check the specific instructions for the fusible product you are using!).
It usually doesn’t take long to fuse into place and the fusible is only to give it a temporary hold so it doesn’t need to be 100%.

Step 4: Sewing the joins
It is likely you will have some scraps on top that don’t touch the fusible as much and they might slip off as you transfer your piece from the ironing surface to your sewing machine. That’s ok. Just pick them back up and place them where they were meant to go.
If you are worried about too many pieces falling off you can use a small bit of glue stick or fabric glue to take it in place before it gets sewn down.

I think these pieces of fabric look best when I have match my thread colour to the colour of my scraps but obviously that is a design choice and if you love a contrast – go for it!
Set your stitch to a zig zag stitch. I usually go for a 2 or 2.5 stitch length to make sure my stitch catches both of the pieces of scrap I am trying to join.
Start sewing on a raw edge near the edge of your piece and follow that raw edge as far as you can, you might need to pivot or turn the piece to just keep sewing along raw edges in a single line. I find this makes it faster than trying to go around each individual scrap. (see the video below if you aren’t sure what I mean!).
Using this method you continue to sew along the raw edge, turning where needed until you hit somewhere where you can’t find another raw edge.
Then do a back stitch, cut your thread and find a new place to start on the fabric to sew along more and more raw edges until you have covered all the raw edges with zig zag stitches.
When you get to the end it will be become a bit more stop start as you’ll be going over smaller areas of raw edges that didn’t happen to join up with any other ones.

Once you get to the end, start clipping your threads, and then you might see little places you missed that need stitched up. So just go through and make sure every raw edge has a zigzag stitch along it.
When you are happy that your fabric is sewn in place give it a final iron.
Step 5: Trim your fabric yardage to size

I trim my made fabric just enough so that I have straight edges, but if you want a particular size, like a pre-cut size or strips then you can do that at this stage.

I tend to leave the pieces as big as I can because I don’t always know in advance what I will use them for.


Below is an Owl Softie I made with several pieces of this ‘made fabric’. You can get the full owl tutorial including free templates by clicking on the picture.

As I add more instalments of my series about how to make fabric from your scraps I will add the links below.
Video Tutorial
Subscribe to Upcycle My Stuff on YouTube for more fun ideas like this one.

How to Make Fabric from your Scraps - Part 1: Irregular Shaped Scraps
Part 1 in a series of different ways you can make fabric out of your leftover fabric scraps from your sewing projects.
Materials
- Pile of irregular shaped fabric scraps - all the same colour or similar colours/patterns
- Lightweight one side fusible
- Matching Thread
Tools
- Pressing Mat or Ironing Board
- Sewing Machine
- Teflon Sheet (optional)
Instructions
- Cut your lightweight fusible to the size of your ironing surface (and or the size that will fit your scraps)
- Place fusible side up on your ironing surface
- Place scraps wrong side down over the fusible and completely cover the surface - overlapping slightly to cover all the fusible.
- Iron in place following the instructions on your fusible product. Do this once the whole surface is covered or use a teflon sheet to protect your iron and do it in sections.
- Take your 'fabric' to the sewing machine and sew along all the raw edges with a zig zag stitch.
- Cut loose threads and trim your fabric yardage to size.
- Finally decide how you will use your brand new made fabric!
Recommended Products
As an Amazon Associate and member of other affiliate programs, earnings are made from qualifying purchases.

If you liked this post don’t forget to Pin it so you can come back to it later!

Other posts you might like:
- 65 Brilliant Ideas for Upcycling your Scrap Fabric
- How to make a Fabric Baby Book from Scrap Fabric!
- 14 Ways to Upcycle Fabric Scraps as Gifts for Kids
- 13 Scrap Fabric Friendly Sewing Patterns on Etsy
- DIY Fabric Wrapped Hangers: The Scrappy Way!
- Scrappy Disappearing Nine Patch Quilt
- Kid’s Art Portfolio from Fabric Samples & Scraps
- Mini Quilt-as-you-go Keychain
- Sewing for Charity


Absolute genius! I’ve been trying to figure our this general concept but you really solidified it. Thanks so much cause I keep ALL my fabric scraps. Just can’t bear to throw them away.
I’m the same! People think I’m a bit nuts sometimes! Glad you liked the tutorial! x Kristen