
Easy Christmas House & Tree Garland to make with Kids!


This Christmas Garland is such an easy Christmas craft for toddlers and uses only a few basic craft supplies.
They will love cutting, decorating, and assembling this string decoration. It’s the perfect way to brighten up your space for Santa!
The Christmas season is one of my favorite times of the year.
I can always get into a Christmassy mood by having a crafty morning making Christmas tree ornaments or other holiday crafts, like these Upcycled Christmas Gift Tags.
I also love making DIY gifts for people, from homemade ornaments to jewelry and accessories. Find some great gifting Christmas craft ideas in this DIY Christmas Gifts post.
This year, I’ve come up with some easy Christmas crafts to get little hands in on the fun too!
This fun craft is also a great way for toddlers and kids to work on their fine motor skills.
This Christmas garland is good for older kids too. They will have so much fun decorating their trees and houses in their own way.
Supply List for Christmas House & Tree Garland

This post contains affiliate links – please see my disclosure policy for more details.
- Template – download the FREE printable template in this post. Download it to print and cut it out.
- Glitters – use your favorite colors or traditional Christmas colors of green and red.
- Glue – use PVA like Elmer’s School Glue for this craft.
- Scissors
- Stapler
- Yarn – use ribbon if you don’t have yarn, or if you prefer a shiny string.
- Thin Cardboard
- Bond paper, craft paper, or upcycled Christmas cards from last year!
How to Make a Christmas House & Tree Garland
Step 1: Cut out the tree and house shapes from your template

Print and cut the template provided on bond paper or craft paper (alternatively use regular printer paper if you want to use it as a template to cut out from other materials like old Christmas cards or wrapping paper.).

After cutting out the shapes, paste them with school glue onto some thin cardboard to make them sturdy.
Then cut the excess cardboard away so the cardboard and glued paper are now the same shape – just two layers thick!
Step 2: Add the glitter.


Add glitter to your Christmas shapes.
Make sure to spread glue all over the templates. You may use colors of your choice.
Step 3: Put windows on the houses.


While it’s drying, cut the windows for the garland on the bond paper (or whatever paper you are using), then paste it to the template once dry.
Step 4: Assemble the garland.


Assemble the garland by using yarn to join the houses and trees together. Use a stapler to attach the yarn.
Make sure to attach it at the back of the garland.
If you want to, you can hang the shapes individually to make Christmas ornaments instead of a garland.
Step 5: Hang it up.
Hang your glittery garland somewhere special and have a Merry Christmas!
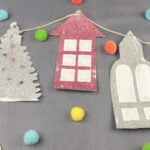
Finished Christmas Tree & House Garland
Here is my finished Christmas Garland, I really like how it turned out. It’s so festive! I am going to use it across my mantlepiece. I think the glittery shimmer will look great near my Christmas tree.

Don’t forget to check out my top tips for this project below, as well as some frequently asked questions you might have been wondering about.
If you love this easy Christmas craft for toddlers, then you will have fantastic fun making this Easy Grinch Christmas Craft for Kids too! These Homemade Personalized Crayons make good use of broken crayons and are a also great gift for 1-5 year olds!
Top Tips for this Christmas House & Tree Garland
- Be careful when using the scissor and the stapler, especially if you are doing this craft with small children.
- A large spill-proof mat or an old sheet is great for putting over the table to let toddlers craft mess-free! Especially important when you are working with glitter!
- Don’t worry if you don’t have the exact materials – use what you have lying around. Get creative, and make it your own! Add some pom poms, sequins, buttons, or pipe cleaners to the houses for extra decoration! If you don’t have glitter then use tissue paper or acrylic paint to color your garland pictures.
Frequently Asked Questions
Bond paper is thicker and more durable than normal printing paper. The heaviest type of bond paper is generally thinner than even the lightest weight of cardstock.
For this craft, you can use something thicker if you prefer.
Reuse old Christmas cards for this garland by cutting out your favorite pictures to add to your tree and house shapes to make a picture. Or you can make window shapes out of shiny Christmas cards or wrapping paper to make them look like glass!
You can use a glue stick instead of PVA for sticking on the windows, but glitter will stick better with PVA glue. You can use glitter glue or glitter paint if you prefer.
Attach your garland to a doorframe, window, mantelpiece, or shelf using Blu-Tac or pushpins.
A place where it can naturally hang down and show off the Christmassy shapes is good. Make sure to position your garland so that the light hits the glitter for a festive, sparkly effect!
The template for this easy Christmas craft for toddlers has townhouses and trees on it, and we use glitter to decorate it, but you can use any shapes and decorations you like.
Find large, printable pictures of Santa or snowmen and add googly eyes to them, then string them together. Or make your snowflake crafts into a garland by stringing them together.
Some other great ideas for decorating your garland would be to add candy canes in between the pictures. Adding found objects like pine cones is also a great way to get older children involved in making fun Christmas crafts.
Printable Project Instructions

Easy Christmas House & Tree Garland
Materials
- Template - find the FREE printable template in this post. Download it to print and cut it out.
- Glitters - use any color.
- Glue - use PVA like Elmer's School Glue.
- Yarn
- Cardboard
- Bond paper
Tools
- Scissors
- Stapler
Instructions
- Print and cut the template provided. After cutting it, paste it onto thin cardboard. Then cut it again.
- Add glitter to shapes. Spread glue all over the templates, and then add any glitter of your choice.
- Let the glitter and glue dry. Cut the windows for the garland on bond paper, then paste it to the template once dry.
- Use yarn to string it together as a garland, attaching the pictures to the yarn with a stapler.
- Hang your glittery garland up!


